There is nothing like a well-designed backsplash to liven up your kitchen. Believe it or not, even on a tight budget, it’s an upgrade you can easily do on your own. Whether you’re using whole tiles, mosaic sheets, or any other tile variety, tile installation always follows the same steps. We recommend ordering ten percent more tile than you need to account for cutting, breakage, and other unexpected needs.
Here’s what you’ll need to install your backsplash.
TOOLS
- Level
- Tape measure
- Utility Knife
- Notched trowel (specific for the type of tile you’re installing)
- Tile cutter
- Tile nipper
- Rubber mallet
- Grout sponge
- Rubber grout floats
- Drill
- Mixing paddle
- Bucket for mixing thinset
- Bucket for mixing grout
MATERIALS
- Wall tile
- Tile adhesive
- Grout
- Caulk
- Pencil
- Tile spacers (if needed)
- Masking or painter’s tape
- Cardboard or drop clothes
- Grout sealer
When taking on this DIY task, be sure to equip yourself with the proper safety gear. Throughout the video, we’ll alert you regarding when you should and should not use the safety gear.
STEP ONE
Prepare area. Before you begin, turn off the power connected to the area where you’ll be working. Since tiling is a messy job, it’s important to take the proper precautions to keep your space and your belongings clean. Be sure to completely clear off your counter. Then, cover it with cardboard or a drop cloth. Remove all outlet covers, and cover them with masking or painter’s tape. Tape off counter and cabinet edges, and touch up any dents or cracks on the wall. In order for your tile adhesive to adhere properly, wipe down the wall with water and a mild cleaner.
STEP TWO
Plan layout. Planning your layout is one of the most important steps to creating a great looking backsplash. We recommend starting at a focal point, such as the center of the backsplash area.
STEP THREE
Determine midpoint. Use a tape measure to determine the center of your backsplash area. Using a level and pencil, mark the midpoint with a vertical reference line on the wall. Starting at this point, position your tiles along the counter to check their placement. If an end piece is too small, adjust your midpoint to allow for larger end pieces.
STEP FOUR
Confirm counter is level. Before installing backsplash, you’ll need to ensure your counter is level. To do this, run a level along your counter to find the lowest point. Mark a point two tiles or a sheet up from this low point, leaving one eighth of an inch at the bottom for caulk. Mark a level line with a pencil across the entire work area.
STEP FIVE
Apply adhesive. Use a notched trowel to evenly apply tile adhesive to the area beneath the horizontal reference line. Using the notched edge, hold the trowel at a forty-five-degree angle to create horizontal ridges. Work in small sections to install the tile before the adhesive dries. If the adhesive dries before you’re able to place the tile, remove it and apply a new coat. Since you’ll be positioning your tiles next to the reference line, be sure it stays visible.
STEP SIX
Place tiles. With a slight twisting motion, press tiles into the adhesive, making sure to leave room at the bottom of the tile for caulk. If your tiles aren’t self-spacing, use plastic spacers to maintain even grout lines.
STEP SEVEN
Install row. Continue placing tiles along your reference line. If your counter top is uneven, you may need to cut tiles that are too tight. Trim any tiles as needed with a wet tile saw. For smaller cuts, use tile nippers.
STEP EIGHT
Small areas. If you need to install tiles in a small area where a trowel won’t fit, you’ll need to do something called back buttering. To do this, apply adhesive to the back of your tiles, using the notched edge of the trowel to create ridges on your adhesive as you apply it.
STEP NINE
Secure tiles. To ensure tiles are even and secure, use a rubber grout float to lightly press the tiles into the adhesive, paying special attention to areas that may not be completely flat. Wipe away any adhesive on the front of the tiles and check for areas where adhesive may be filling the grooves. In order to have enough room for your grout, wipe away any excess adhesive in the gaps.
STEP TEN
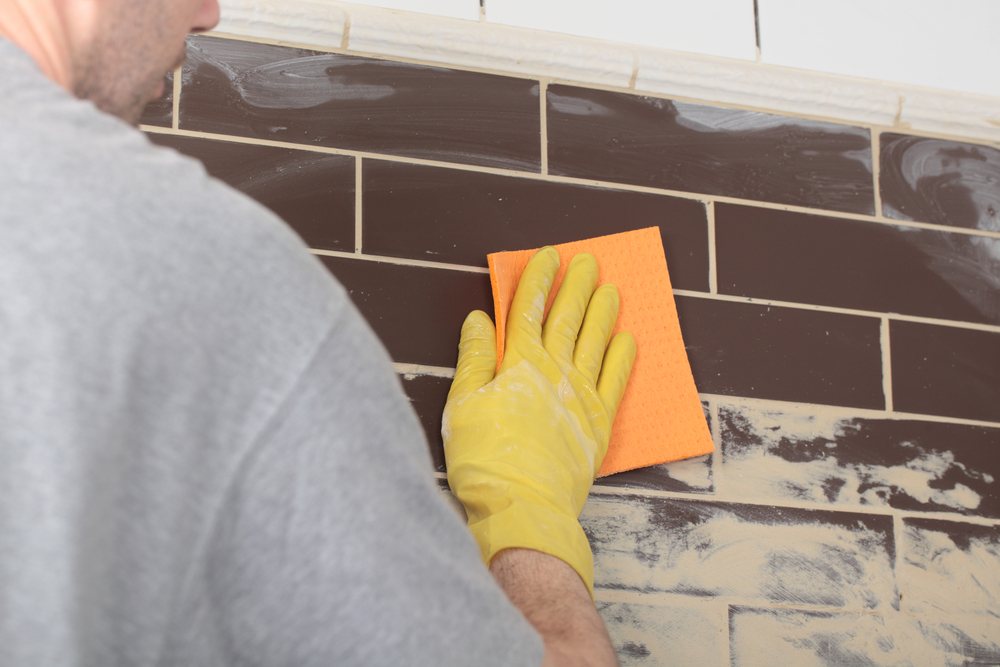
Apply grout. If you used spacers, remove them from your tile and wipe the backsplash with a damp sponge. Mix the grout in a bucket according to the manufacturer instructions, and apply diagonally against the grout lines with a rubber grout float. Wait ten minutes. Then, wipe the tile with a damp sponge. You may need to do this several times. Be sure to use clean water each time.
STEP ELEVEN
Clean and seal. A grey film called “grout haze” may form over the tile as it dries. To remove grout haze, simply wipe with a damp sponge after your grout has set. Let the grout set for a few days to ensure it’s completely dry before sealing. Once dry, use caulk to fill edges along the countertop. Then, apply grout sealer.
Once your sealer has dried, per manufacturer instructions, your project is complete. Revel in your beautiful new backsplash.
Looking for great tools to help get your project done? Shop Stanley, Black & Decker and DeWALT for everything you need!


Leave a Reply